This system is designed to allow the printing of student transcripts on demand for parents or other educational institutions. It will also allow the tracking of student progress toward fulfilling graduation requirements.
The system will store student course information (course final marks) for several years while the student is attending school. Every year, at the end of a reporting period (ie. semester, quad) when a course is finished, student marks are 'posted' or copied into a transcript data table. This information can then be stored as long as desired.
This multi-year data can then be printed into a customizable PDF transcript report which includes his/her performance over several years. The data can be viewed in other ways as well, such as to track student progress towards completion of graduation requirements.
The outline for workflow:
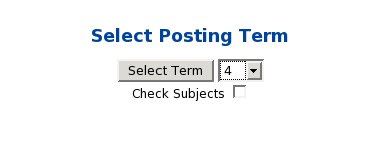
The system is located on the report card page at the top right hand corner. It consists of:
Next, we have the displayed the courses that finish in that term (and have already had all final marks entered into that term). This previous checkbox was selected, and so all courses are selected in this screen.

Next, I deselected all courses but Science 10 and clicked the Select Subjects button.
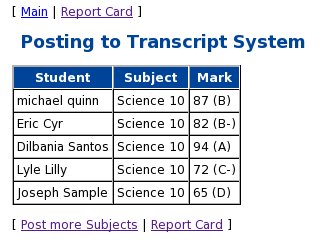
The students in that class then have their final mark from term 4 posted into the transcript system. This includes storing a record in the transcript data table for this course and adding their personal information to the transcript identity table which includes their name, birthdate, and provincial or state, etc. student number. This last step is only done if they do not already have an identity record.
This information will now appear in all of his/her transcripts.
Note: For classes that are marked on a Pass/Fail basis, a letter mark of 'P' will be posted into transcripts using this letter value. Normally numeric grades are submitted and then converted to a letter grade using values in the transcript configuration file.
Any letter values posted will be passed through into transcripts, but will not correctly function in terms of graduation requirements (if this matters). A 'P' value (or the value of the $passletter in the config file) will be included as a credit in the transcript report, but will not affect the GPA (Grade Point Average).
Any other letters in the letter scores that aren't in the configuration file will be ignored for calculation purposes, and will have the credit set to zero (but it will print on the transcripts). This is useful for withdraw pass (W/P - withdrew while passing). It will handle the W/F (Withdraw while Failing) in the same way.
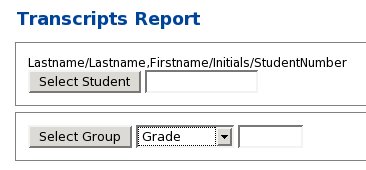
The first screen allows student selection. For students in the transcript system, you can search for them by name, initials, or student number. The 'initials' approach is certainly the fastest approach.
For current students, the lower box will allow selection by grade or homeroom. Again, this report only shows values in the transcript system (and not current courses only in the report card system, and not yet posted).
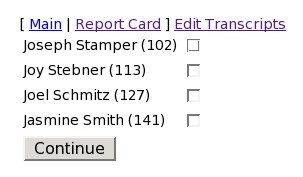
The next screen will then show the students that match your search. If you did a Name search, the students that have values in the transcript system matching your search are displayed. If you did a Grade/Homeroom search, current students in that group are displayed (if they have transcript information).
The last screen will display the actual student transcript system values, along with a link to the PDF version of the transcript.
This system is controlled by a configuration file called transcript.conf located in the etc folder along with the other configuration files for that school. This file will be maintained by your network / system administrator. It can be viewed from the Start/End of Year page by using the View Configuration Files button on the left hand side of the screen.
It contains the following:
# Description under course and credits on right side of transcript
$section1 = "Honours classes receive extra +0.5 grade point.\n\n" .
 "AP classes receive +1.0 extra grade point\n\n";

# Pass / Fail Categories

# The failletter is the letter grade for which no credit will be
# granted for the course. It is assigned as part of the transcript
# posting process and uses the markToLetter settings below.

# The passletter has a different use. It is only used for Pass/Fail
# courses to indicate a pass has been achieved. A pass/fail course will
# not affect the grade point average at all. It will only add to the
# student credits.

$failletter = 'F';
$passletter = 'P';

# Translates a letter grade into a quality score for GPA calculations

%letterToQual = (
	'A+' => '4.00',	'A' => '4.00',	'A-' =>	 '3.67',
	'B+' => '3.33',	'B' => '3',	'B-' => '2.67',
	'C+' => '2.33',	'C' => '2',	'C-' => '1.67',
	'D+' => '1.33',	'D' => '1',	'D-' => '0.67',
	'F' => '0');


# Translates a numeric score to a letter grade

# Mark values greater than or equal to ('>=') a value on the left receive the
# letter grade on the right. For example, an 82.6 on this scale would
# receive a 'B', as would an 82.5. An 82.4 mark would receive a 'B-'
# letter grade. More decimals may be used if desired.

%markToLetter = (
	'97.5' => 'A+',	'92.5' => 'A',	'89.5' => 'A-',
	'87.5' => 'B+',	'82.5' => 'B',	'79.5' => 'B-',
	'78.5' => 'C+',	'72.5' => 'C',	'69.5' => 'C-',
	'67.5' => 'D+',	'62.5' => 'D',	'59.9' => 'D-',
	'0' => 'F'
	);


# Categories of Courses and Requirements

# This lists the required areas of study and the requirements for
# graduation. It is used as the selection list of subject areas when
# adding or editing a subject on the report card page. It is also
# used when editing existing transcript records.

# In transcript printing, this section prints on the right hand side
# of the transcript and controls which areas are checked as being
# complete on finished transcript.

%gradRequirements = (
	'English' => '4', 'Social Studies' => '3.5', 'Science' => '3',
	'Math' => '3',	'Languages' => '2', 'Bible' => '2',
	'Worldview' => '1', 'Fine Arts' => '1',	'Phys Ed' => '0.5',
	'Health' => '0.5', 'Logic' => '1', 'Other' => '0'
	);


# Term Descriptions

# This section defines the values that are used when posting
# descriptions of particular terms into the transcript system from the
# report card system. These two lists, the Term Descriptions, and the
# Term Keys, together 'map' a particular term to a particular description.

# Term Descriptions   use $term_desc{ $term_key{1} }
%term_desc = (
	'a' => 'Fall Semester',
	'b' => 'Spring Semester',
	'c' => 'Undefined'
	);

%term_key = (
	'1' => 'a',	'2' => 'a',	'3' => 'b',
	'4' => 'b',	'5' => 'c',	'6' => 'c',
	'7' => 'c',	'8' => 'c'
	);